Snaefellsnes Peninsula is often called mini Iceland for its mix of sights from all around the country. While it does condense a lot of Iceland into on spot, it also has many sights of its own that we you won’t find anywhere else. Now Snaefellsnes, like many Icelandic words, was a bit of a mouthful for us, and one of those that we probably never really got right, so we gave it the affectionate nickname Snuffalus, but I’ll stick with its proper name here.
-
Kirkjufell Mountain Hike and Kirkjufellsfoss Waterfall - The hike that beat us
-
Djúpalónssandur Volcanic Beach Walk & Strength Test - Also home to a ship wreck
-
Londrangar Hiking Adventure or Viewpoint - Coastal rock formations & obstacles
-
Hellnar - Arnarstapi Walk or Hike - Lava fields, coastal vistas, & sea arches
-
Glymur Waterfall Hike - Second tallest in Iceland
Check out Iceland Itinerary to see all of these stops on a map.
Check out our full Iceland Highlights Playlist on Youtube. We have more videos coming so stop back to check it out or subscribe to our newsletter to make sure you don’t miss anything.
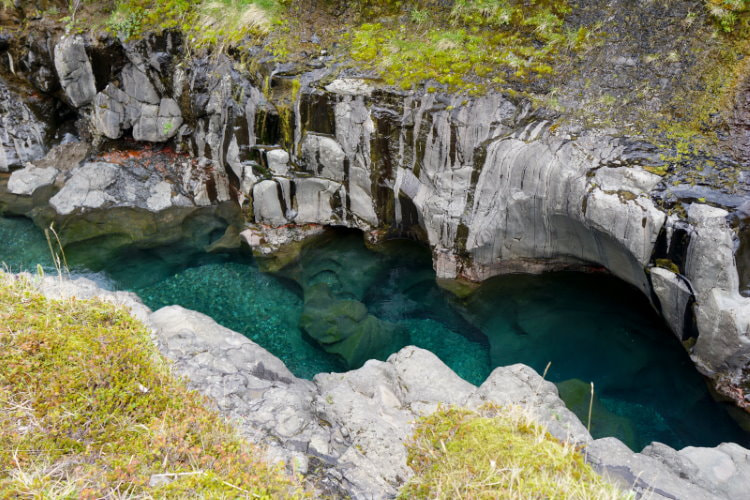
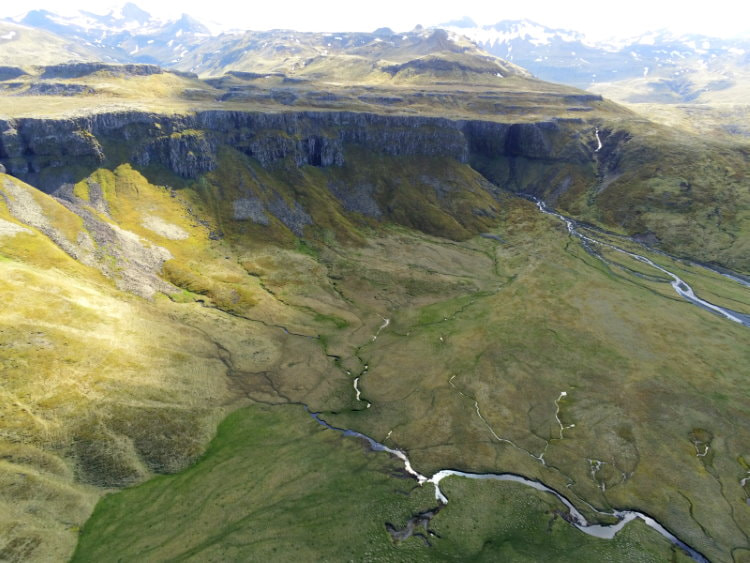
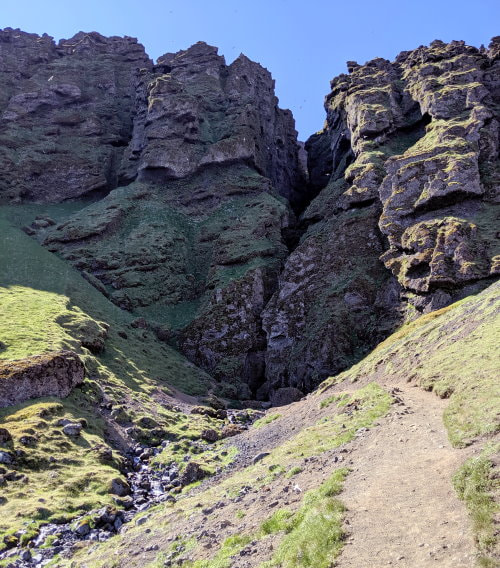
In Between: Turning off the Ring Road onto route 59, 60, and 54 on the way to Stykkishólmur was a bit bumpy going in spots, but overall a fairly decent gravel road. It wasn’t the most exciting stretch of road in Iceland, but it did have plenty of mountain views and the occasional glimpse of the water. This canyon was a total surprise when we pulled off for a quick break. You can find it at GPS Coordinates: 65.0069,-21.8868556 Map. It continues onto private property so this is a quick get out and take a quick look kind of stop, but makes a nice spot to stretch your legs.
Back on the road we watched a large white goose take off. I know geese are common, but I’ve never seen anything quite like this. It started off running in a field by the road and leapt into the air with its wings flapping in slow powerful strokes, almost like slow motion. As we watched we noticed that it was not gaining much altitude and was on a direct trajectory for the road we were driving on. We slowed down and it flew right in front of us. It was a little scary thinking about the possible ramifications of hitting a bird that size for us and the bird, but very cool to see.
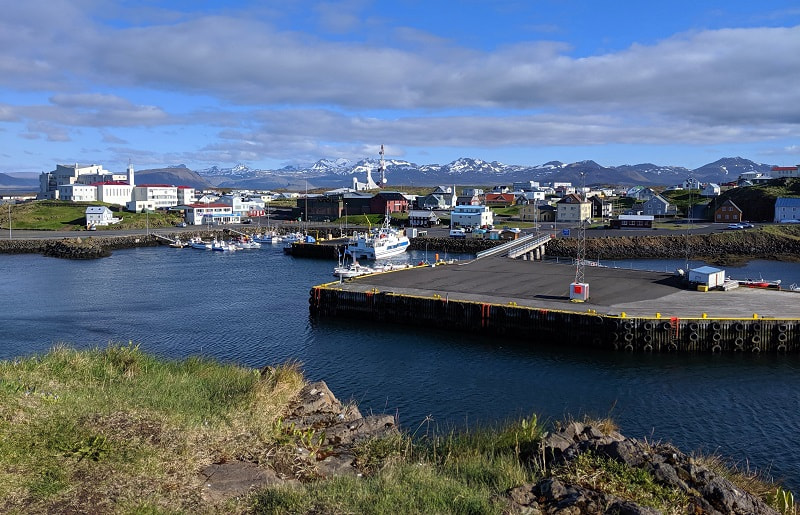
As we neared Stykkisholmur we had a great view of the town out on the peninsula and could also see a fishing boat (Þorgeir or Thorgeir) beached on an island. Supposedly it has been there since the 80s and it is a popular place to kayak around.
Explored the Town of Stykkishólmur
Location: Lighthouse Parking - GPS Coordinates: 65.079704, -22.724220 Map
This is a cute little town that boasts a fancy pool, midnight golfing (in select months), and boat tours of Breiðafjörður Bay. They also have several restaurants and a Bonus grocery store if you need to resupply. It is the biggest town on the Snæfellsnes Peninsula so if you need diesel this would be a good stop.
We walked up to the church, and then around the town to Súgandisey Island Lighthouse. The lighthouse is perched on a tall stoney island that gives you a great view of the town.
We stayed at Stykkishólmur Campsite, just off the golf course.
How Much Time and When?: If you just want to see the town you don’t need more than an hour here, but if you want to do a boat tour you will need to plan ahead. They offer a variety of experiences, but Breiðafjörður Bay is a popular place to look for the puffins that nest in many of the islands.
Road & Parking: The road to and through the town was actually better than the main road we were taking around the peninsula. There was a decent amount of parking near the harbor.
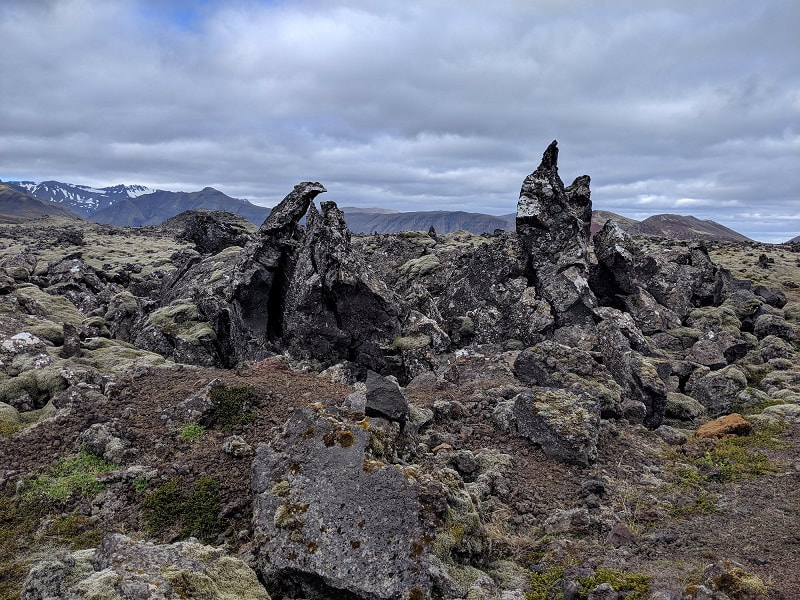
Berserkjahraun Lava Fields Scenic Drive
Location: Start GPS Coordinates: 64.96594, -22.89825 Map, Finish GPS Coordinates: 64.95609, -23.03814 Map
We traveled from A to B and finished at C. The Brown Cars are a few of the many pull-off spots that I noted in case you need a break. I also included a few extra photos in the map but they are only visible in the large view (click the rectangle in the right corner).
This was a bumpy drive but a stunning area. We got out to look around a couple times, but most of this experience was spent plodding along in the van with our eyes torn between the landscape and the road.
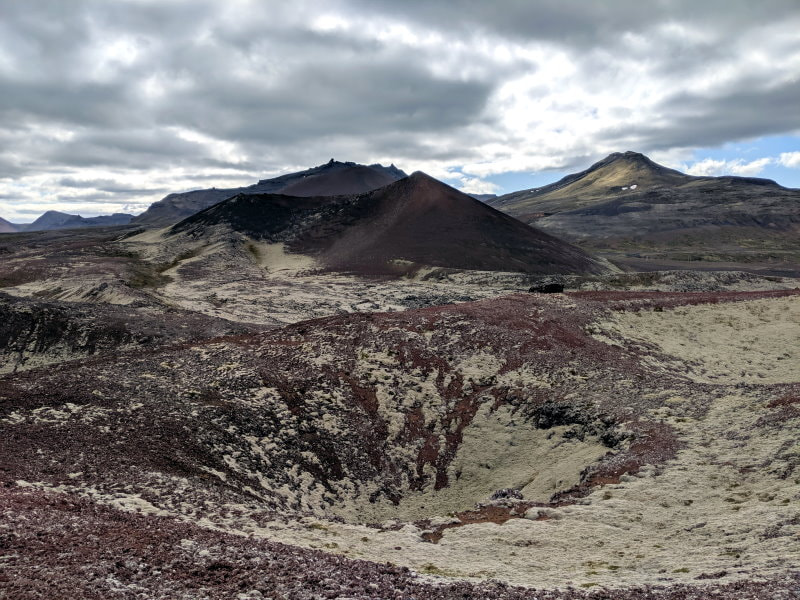
Berserkjahraun was one of those areas that I had found mention of on the internet and seen a couple stunning photos, but wasn’t really sure what or where it was. It turns out that Berserkjahraun is a couple things. It is a large lava field area and also the name of route 558, which goes through a scenic section of that area. We drove the full length of 558 and there were no homes and only a couple rough unmarked roads. It seemed to exist solely as access to explore the lava fields.
We saw plenty of lava fields along the Ring Road, but they were mostly just bumpy fields. This place had some of that, but was more colorful and jagged.
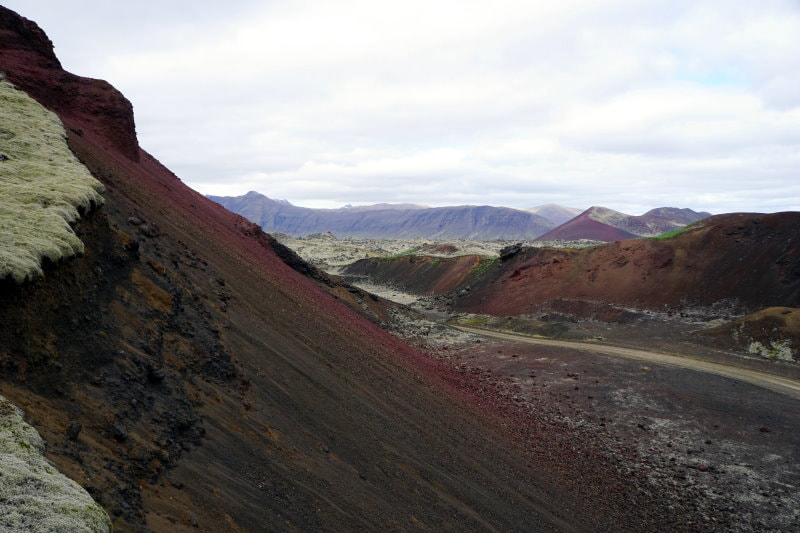
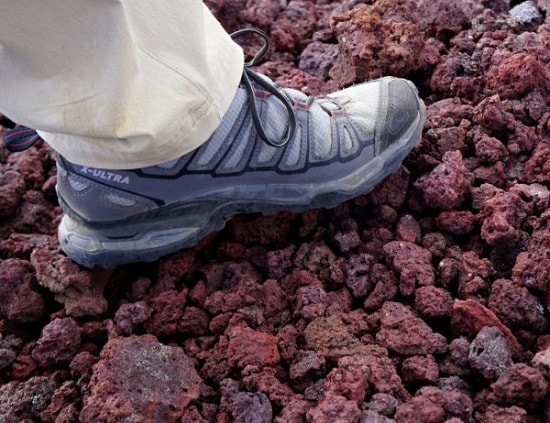
We did one short hike to look into the twin craters. The way up took us along a lightly traveled path over golf ball size lava rocks that varied between black and scarlet red. Unlike golf balls they were all bumpy so they stuck together and weren’t bad to walk on but you still have to be careful.
The top of the crater revealed another of Iceland’s otherworldly vistas. The colors and contours of the land just didn’t look like it belonged on this planet. This seemed to truly be a hidden gem and we were glad we found it.
On our way back to the van we did our part by cleaning up a couple lava rocks that had tumbled into the road and selected the best one as a souvenir. I am not saying I recommend collecting rocks, but we felt in a place like this, where the road is literally made out of them, it was probably ok to take one; just make sure there aren’t any lichens on it.
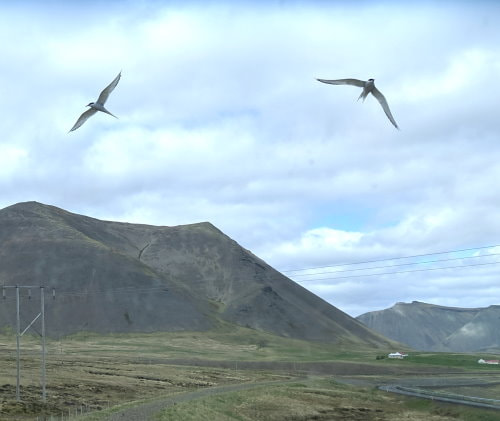
Every corner of this place had something new to look at and I think the slow speeds helped us see more of the definition of the lava that you just don’t get when you are buzzing down the highway. Just as we approached the end of this road we had some more close encounters with bird life, but this time they were fast and we were slow.
How Much Time and When?: We arrived around 9AM and spent about 2 hours with only a few stops.
Difficulty: Easy, just sit back and take in the views but it is a bit of a rough drive depending on your vehicle. The trail to the crater was a bit slick.
Facilities: None
Road & Parking: The first few minutes on this road made us question our decision of taking the van down it and was one of the worst areas we drove through, but then it smoothed out. Please use your judgment because conditions are constantly changing. We saw a couple derelict car parts along the way including a strut assembly. This road was only wide enough for one vehicle in most areas and we were happy not to see any others on our drive through. Passing in opposite directions without a 4x4 would be tricky. There were occasional pull-offs along the side of the road, a few of which I marked on the map with a Brown Car.
What to Bring: Make sure you have a spare tire just in case.
In Between: If you have spent much time looking at pictures of Iceland you have probably stumbled across the iconic “whale tail bridge” that crosses Kolgrafafjödur. This is on the northern coast of the Snæfellsnes Peninsula at GPS Coordinates: 64.951511, -23.159039 Map. We weren’t able to get any decent shots of the bridge from in the car so we stopped at the first parking area after the bridge. We couldn’t see the bridge from there, but there was a nice view accompanied by some interesting signs talking about some of the history and legends of the area (GPS Coordinates: 64.951511, -23.159039 Map.
Grundarfoss Waterfall Short Hike
Location: Parking - GPS Coordinates: 64.922565, -23.222499 Map
This was a nice waterfall in a beautiful location. It starts off at a gate that you go through and close behind you. The path mostly takes you through a gentle field, but had a couple stream crossings. There were stones on most of them so depending on the amount of water, you might be able to make it across with dry feet. You can make it right up to the waterfall, but we chose to turn back at the crossing below because part of the cable to cross it was damaged and we didn’t feel like accidentally swimming.
How Much Time and When?: We arrived around 3:30 PM and there was only one other group there. I think the lighting on the waterfall would be a bit better in the morning, but the afternoon light was great on the landscape around. About an hour would be sufficient depending on how far you want to go.
Difficulty: Easy trail with some easy water crossings and some more challenging optional ones. The trail was easy to follow and there were a couple signs to point you in the right direction.
Road & Parking: There is a large pull off right on the main road. It could easily accommodate at least 6 vehicles.
What to Bring: Waterproof shoes will help with the stream crossings and hiking poles aren’t really necessary for the trail, but can be nice for some stability on the slick rocks.
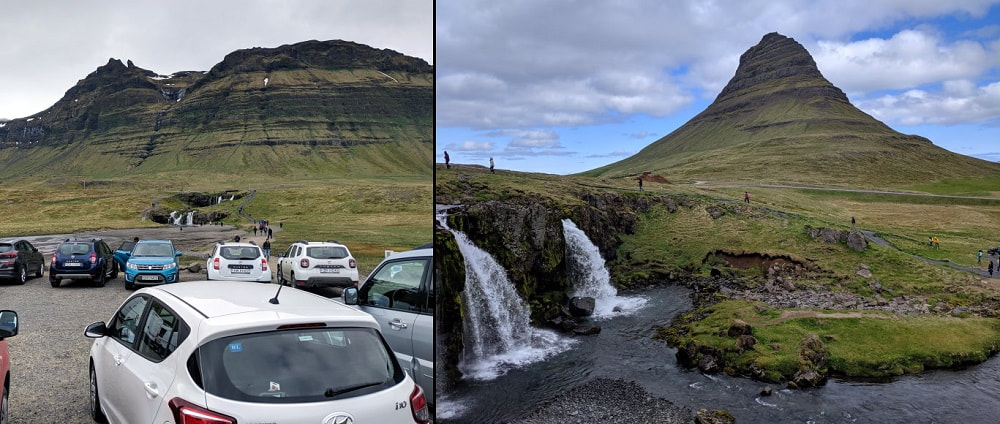
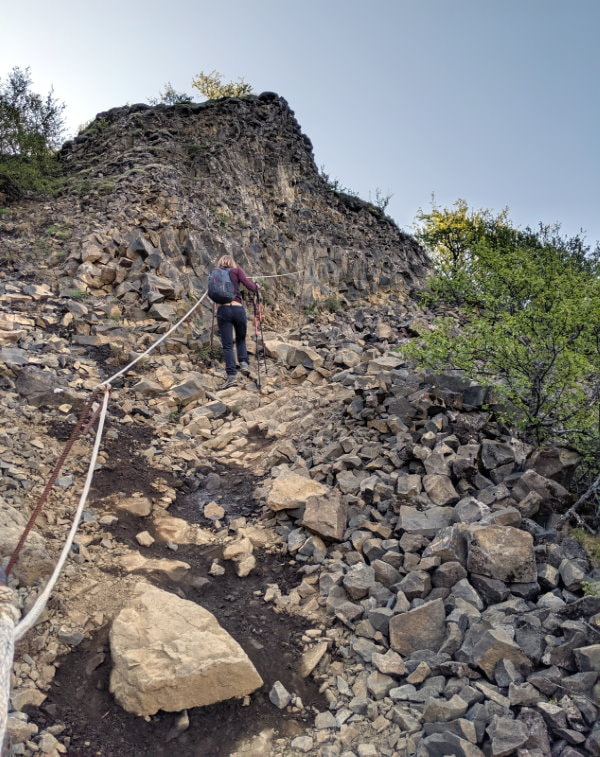
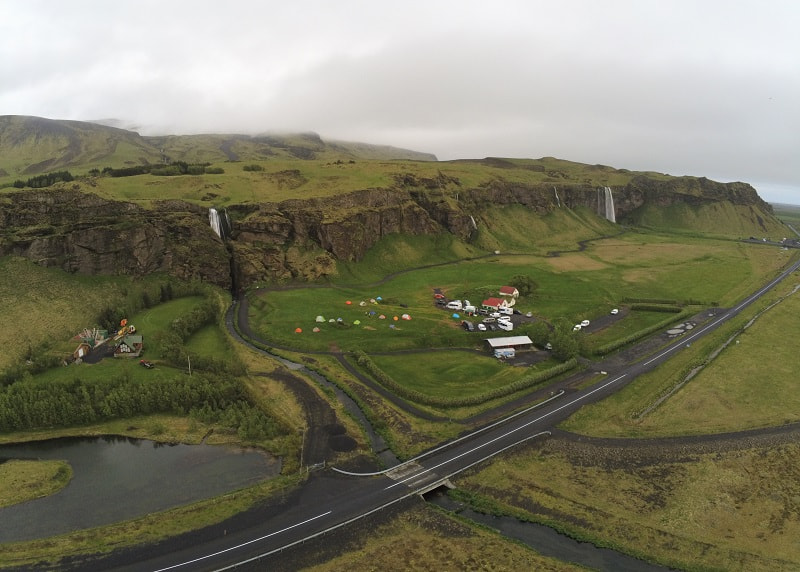
Kirkjufell Mountain Hike and Kirkjufellsfoss Waterfall
Location: Parking - GPS Coordinates: 64.927340, -23.307032 Map, Overflow Parking can be found across the bridge on either side at GPS Coordinates: 64.925952, -23.302791
Now I would not say I had huge expectations for Kirkjufellsfoss, but I was surprised how underwhelming it was; especially since it seems to be one of the most iconic Icelandic waterfalls in recent years. Kirkjufell Mountain on the other hand was quite impressive, although treacherous.
There is nothing wrong with this waterfall, I just didn’t feel that its size or beauty lived up to all the hype and felt it was over crowded for what it was. If you want to grab that iconic shot for yourself just go up and around the waterfall to the far side and you’ll have it.
After taking a quick look at the waterfall we geared up for the mountain hike. This hike does have some info on AllTrails but the map may not be completely accurate and the trail is not marked. Our attempt to climb Kirkjufell ended unsuccessfully (due to the crumbling trail) with our egos a bit bruised, but our bodies intact. Although out attempt was unsuccessful, we did make it a good bit of the way up and the view was spectacular! This trail is marked hard for a good reason, but the lower section of the trail isn’t that bad, so you might want to consider going partway for a moderate hike. Even if you are just doing the lower portion I would still recommend hiking poles and solid hiking shoes.
To get to the trail, walk along the road towards the mountain. Take a right onto a gravel road and follow that until you reach about 64.929669, -23.312958, then follow the fence on your right up the mountain.
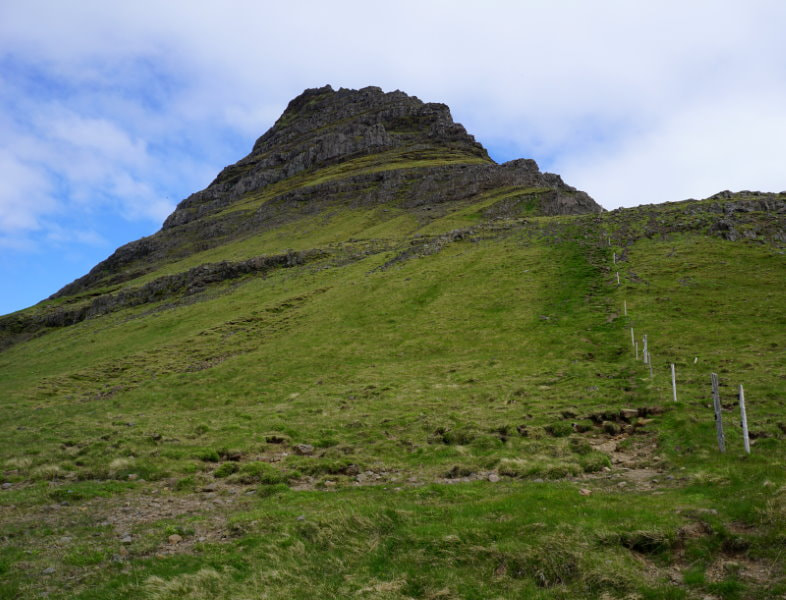
This part of the trail is easy to find and follow. There were a few wet and mucky spots. It started out easy and gradually got steeper. The trail was a crumbly mix of dirt and gravel in many places, acting almost like walking on marbles, making it very difficult to get a solid footing.
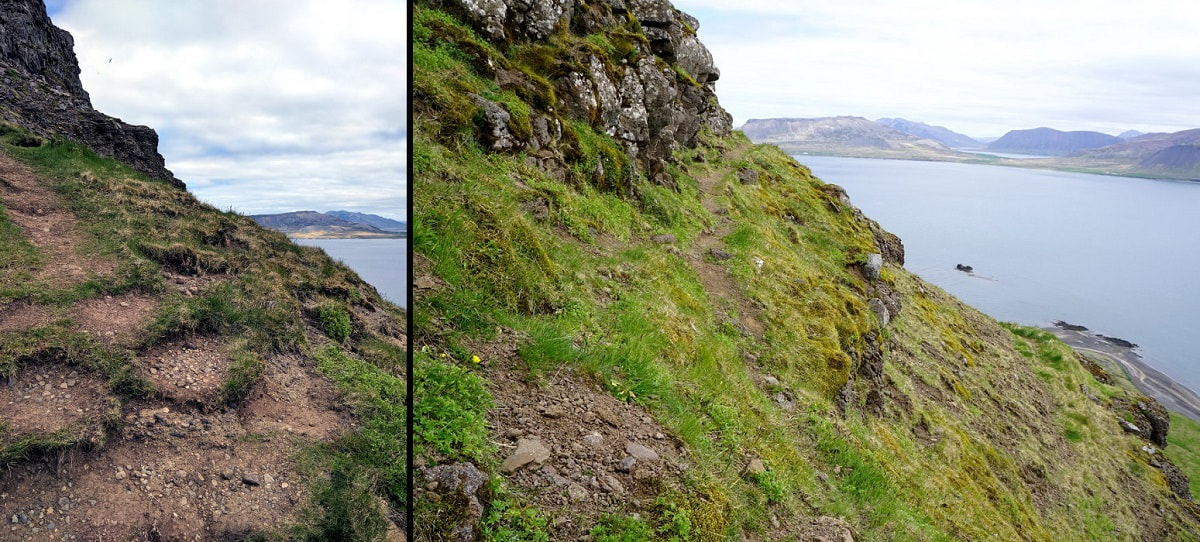
At the top of the fence section the trail gets a bit unclear and based off some of the AllTrails trackers it looks like there may be more than one option. We tried crossing the fence and going around the side of the mountain to the right, but didn’t get very far. The path narrowed into a crumbling ledge and we decided to turn back somewhere around 64.935547, -23.305364 (just around the corner from the right image above). There appeared to be a way up around the corner, but it involved a rock scramble that we weren’t willing to try on such a windy exposed mountain face with unsure footing. We checked to the left and it looked like there was a similar rock scramble option there as well. Both may have been ok to get up, but we weren’t sure how we would ever safely get back down.

We tried out the drone to see if we could scout out another less dangerous path, but gave up on that and hung out for a little bit to savor the view before heading back down. On the way back down even with the hiking poles we had to slide in a couple areas. Quitting is very hard for both of us, but we were glad that we were able to swallow our pride and turn back, instead of potentially getting in a bad situation or worse.
How Much Time and When?: If you are here for the waterfall it will probably be busy. This is a popular Northern Lights viewing spot so even at night this area may still be busy. If you are here for the mountain you will want to go late spring through fall because ice can make it impassable. We got here around 11:15 AM and left a little after 2 PM, but that included the waterfall, the hike, and lunch. Our abridged hike was from about 12:30 PM to 2 PM.
Difficulty: The waterfall is an easy walk on a gravel trail. The mountain is hard, but can be modified to do a partial version that still gives you the spectacular views, but is more moderate.
Facilities: Just a basic sign at the waterfall and some parking.
Road & Parking: When we arrived, the Kirkjufellsfoss parking area was completely full, with a small traffic jam of people trying to get in and vehicles illegally parking all over the place. We doubled back and found a spot to park by the bridge that was a bit rough for the van, but manageable. There may have once been parking across the street from the main parking (Google Map still showed it) but that area is marked explicitly as no parking now.
What to Bring:
Waterfall: Just a camera
Mountain:
- Shoes: Some decent grippy shoes, preferably waterproof. We wore Salomon Hiking Shoes and KEEN Targhee boots mid-ankle boots.
- Hiking poles: Going up they helped, but I think going down would have been dangerous in some of the upper sections without them to stop us from sliding.
- Water: Any hydration pack or bottle will do.
- Pack: Make sure you have a bag that you can stow your hiking poles in for the rock scrambles so your hands are free.
- Sunscreen: This trail is completely exposed
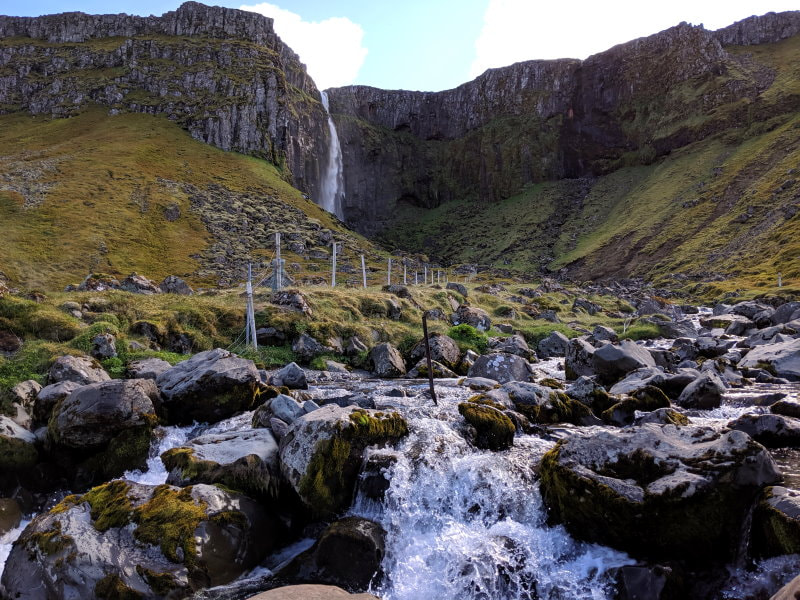
Bæjarfoss Waterfall Stop or Hike
Location: Parking - GPS Coordinates: 64.893455, -23.715790 Map
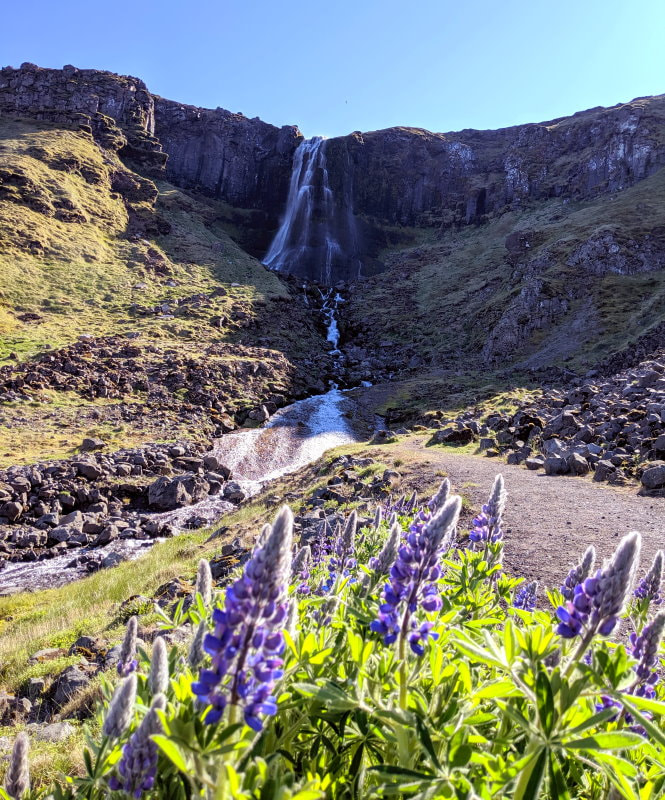
This was an interesting spot at the back of town. This waterfall was next to an avalanche wall and had a spotlight near the base. The canyon was coated in green moss and had lots of flowers. You can check this one out right from the road, walk across the rocks at the bottom and climb up the far sides, or if you are really daring you could attempt the crumbly hillside and try for the top. I climbed up the far side a ways and it was quite soggy in some areas.
How Much Time and When?: You will have better lighting in the morning. We were here around 5PM. You can just hop out for a couple minutes to take a look or spend a bit more time depending on how far up you want to go. It took me about 10 minutes to get from the parking lot up to near the foot of the falls.
Road & Parking: We parked near some apartment buildings.
Svödufoss Waterfalls Walk
Location: Parking - GPS Coordinates: 64.900344, -23.810442 Map

Svodufoss had cool backdrop of Snæfellsjökull Glacier, but otherwise wasn’t particularly notable. I think this one might be more exciting up close, but from the observation point it was hard to see that much. There weren’t any signs saying explicitly not to go beyond the lookout, but the wall seemed to imply that it was the stopping point. We could see some trails up by the waterfall and other people’s photos on Google showed people right up at the waterfall.
How Much Time and When?: 15 minutes, you will have much better lighting in the morning.
Difficulty: Easy flat trail of corrugated plastic filled with gravel
Facilities: A sign and waste bins, Kerlingarfoss is also right down the road.
Road & Parking: This place was a bit bizarre. The road was a bumpy gravel road with a huge perfectly flat concrete slab for parking that could probably accommodate a couple dozen vehicles. There were a couple Icelandic horses along the road.
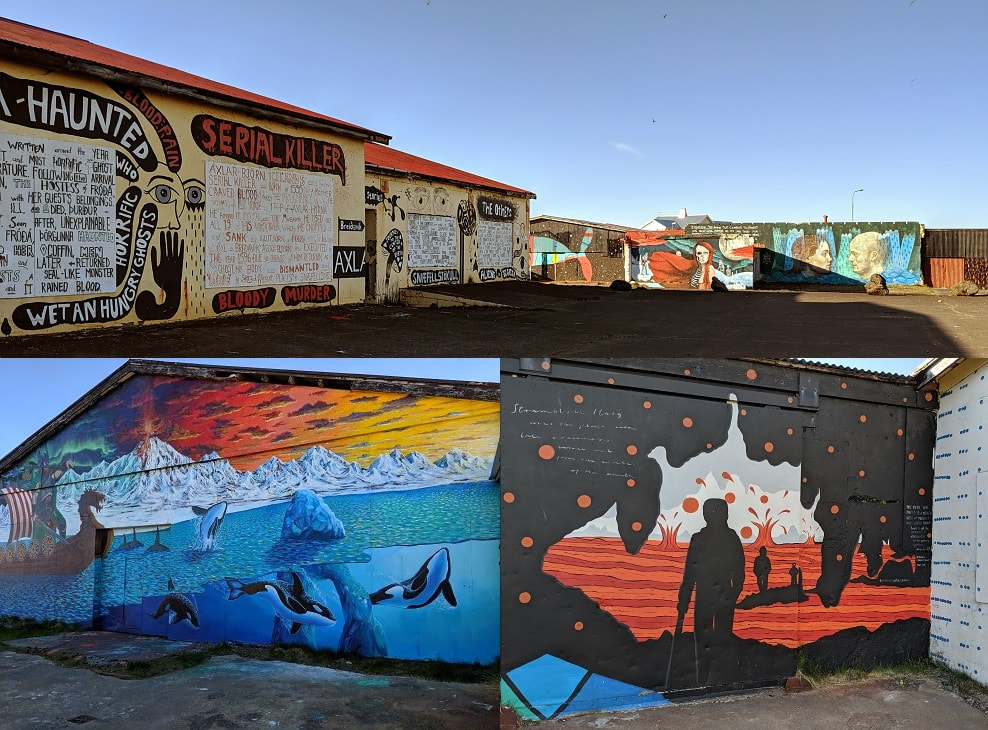
Hellissandur Street Art Town
Location: There are a few murals to look at all over town, but the highest concentration is around GPS Coordinates: 64.918631, -23.885061 Map.
We stayed at Hellissandur Campsite and went for a beautiful evening walk through town. Even if you are just passing through I would still recommend taking a quick look. They have lots of murals and a wide variety of scenes. One tells an entire story (in English) across several frames. I’m not an art or museum person, but this was a neat place.
Skarðsvík Volcanic White Sand Beach
Location: Parking - GPS Coordinates: 64.880855, -23.985791 Map
With all black sand and pebble beaches this one is a bit of an oddity. This is a lone white sand beach in the midst of a lava field. We made a quick stop here (probably 20 minutes) in late evening and spotted an arctic fox scavenging for eggs or chicks. There were also lots of seabirds fishing just off shore and we watched a giant gannet shoot straight down like a missile into the water.
Saxhóll Crater
Location: Parking - GPS Coordinates: 64.851183, -23.924382 Map
If you haven’t made it to a crater Saxholl is an easy one to visit. My favorites were Hverfjall Crater at Lake Myvatn and the twin craters in Berserkjahraun Lava Field, so this one really just didn’t compare, but it was still nice. Unlike all the others we saw, this one has stairs to take you to the top, instead of hiking a trail.
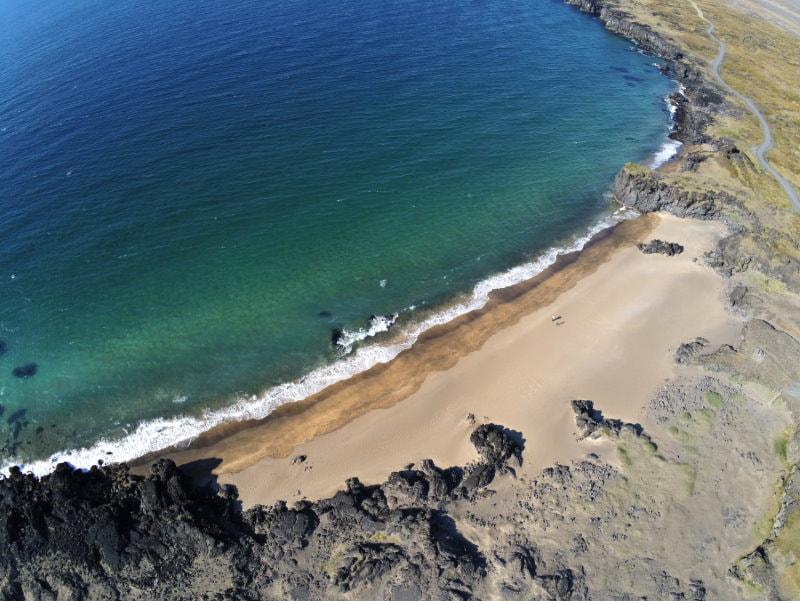
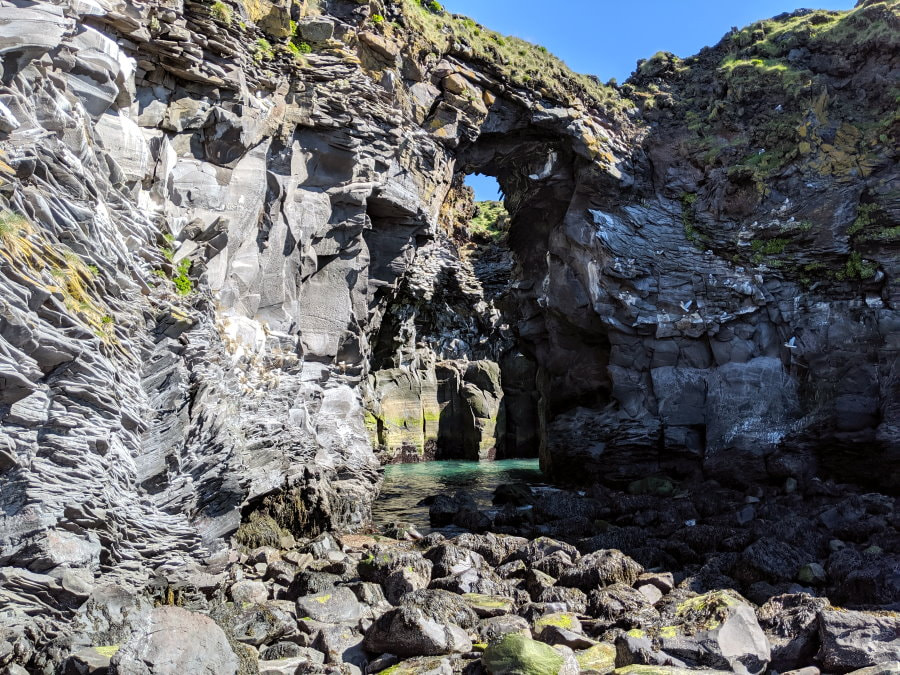
Djúpalónssandur Volcanic Beach Walk & Strength Test
Location: Parking - GPS Coordinates: 64.753502, -23.895191 Map
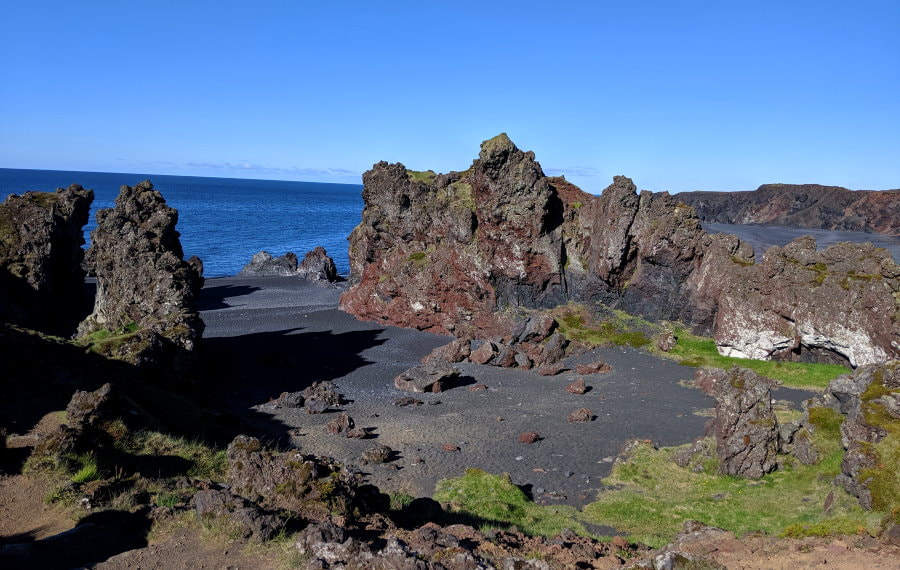
This beach was one of my favorites. Djupalonssandur was big enough that you really felt like you were exploring it, but not so big that I would call it a hike. It was a black pebble beach surrounded by jagged red lava formations and home to the remnants of a shipwreck. Down by the water little tidal pools form at low tide and in one corner you can test your strength at lifting some large rounded stones. Supposedly this was the test a boy would have to pass to join a fishing crew.
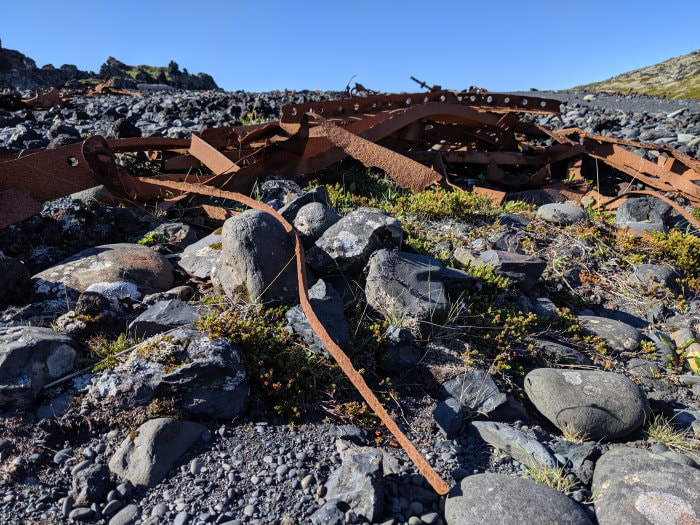
This place felt like something out of a dinosaur movie to me. Walls of lava divide the beach so you can never really tell what is around the next corner. The shipwreck has very little resemblance to a ship, but looks more like a bomb exploded leaving twisted metal everywhere, now rusted with age. Through one of the arches in the walls of lava we were able to see the Snæfellsjökull Glacier. Yes, you can see it everywhere from the main road, and some days you can even see it from Reykjavík, but there is something special about looking at ice through what was once molten rock.
How Much Time and When?: I would budget about an hour.
Difficulty: Easy walking on a pebble and sand beach.
Facilities: They have excellent signs explaining things like the history of the shipwreck and the stones. Like much of this national park, this area is connected to many others by trails and you could walk from one to the next. There was one picnic table.
Road & Parking: There was a medium lot with parking for at least a dozen cars just a short way off the main road.
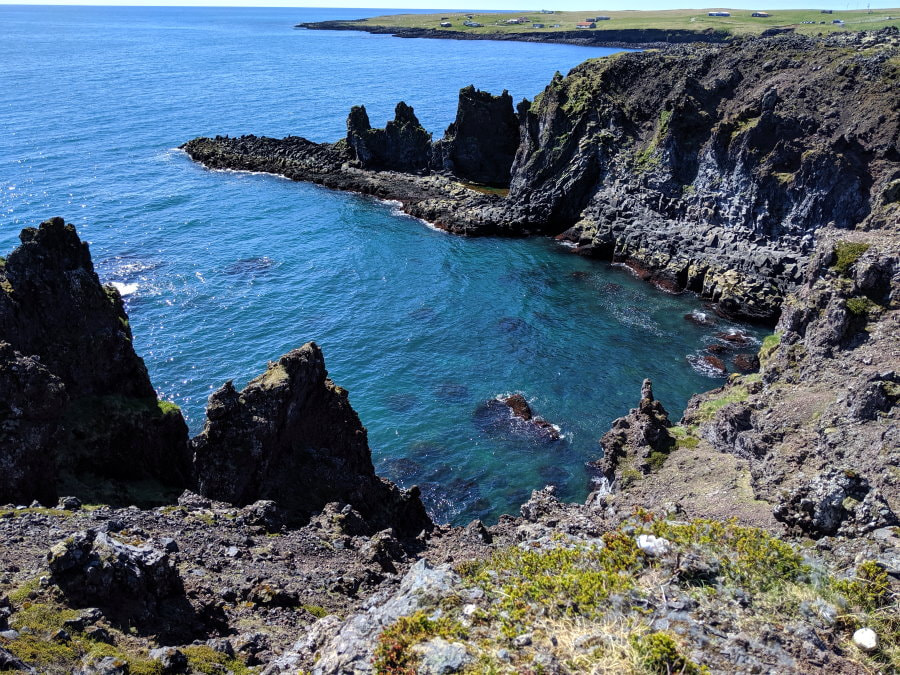
Londrangar Hiking Adventure or Viewpoint
Location: Visitor Center Parking - GPS Coordinates: 64.730474, -23.803493 Map, Viewpoint Parking- GPS Coordinates: 64.737498, -23.775450 Map
To visit Londrangar you have the choice of an easy hike from the Gestastofa Visitor Center or a short walk to the Londrangar Viewpoint. The viewpoint is on a cliff overlooking Londrangar and the surrounding area. It will take less time, but you will not see Londrangar up close. You can hike down from the viewpoint instead of from the visitor center, but it is about the same distance, and is fairly steep getting up and down from the viewpoint.
If you hike from the visitor center you will be able to walk right up to the formations and see them from all different angles, as well as enjoy the stunning walk along the coast. You also have the option of checking out the free visitor center (and water closet) and trying out some of the play features near the center. We really didn’t know what many of them were and tried to determine whether this was supposed to be a playground, boot camp obstacle course, or something in the middle.
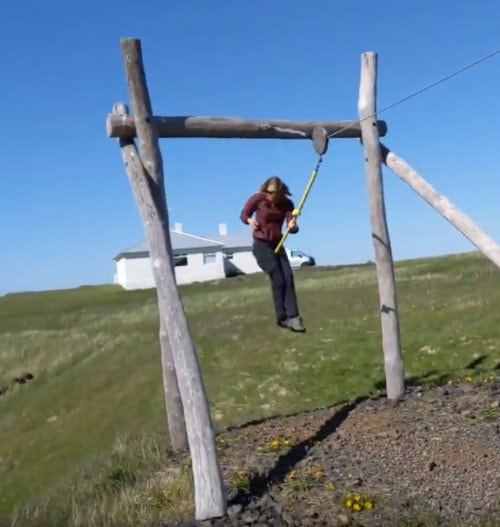
There was one that we knew exactly what to do with. It was a zip line style swing and was a blast. I tested it out in the middle to make sure I cleared the ground and then tried it out. It went a lot faster than I expected and about halfway down I started getting a little concerned about the end of the line. The end swung out over a little crater. That picture is me right as I hit the end and held my breath while I discovered whether it was built sturdy enough or not. It was a bit of a thrill, and since the first time didn’t kill me I went for a second round while holding my camera, but this time I managed to bash my nose on the rope when it swing violently at the end. It was worth it.
The trail to Londrangar started out grassy, then turned to dirt and rocks. It had a few dips, but was mostly flat. It took us right up to the foot of these two seaside pinnacles. They felt much bigger close up than I expected them to be and were interesting, but not particularly special. Combined with the views of the sea and the backdrop of the glacier I think this was a very nice walk. We were some of only a couple people out here, but there were many up on the observation deck.
How Much Time and When?: The visitor center sign says that the trial takes about 30 minutes. It took us about 20 minutes with some fooling around on the playground to get to the foot of Londrangar and another 10 minutes to get a bit over halfway to the viewpoint for a good view looking back the other way. I think any time of day would be fine for the visitor center trail since you get to see it from all sides. The lighting from the viewpoint side is best in the morning, but also supposed to be nice at sunset. We were here around 10AM and from the viewpoint side the lighting was good, from the visitor center they were mostly silhouettes, with the sun behind them.
Difficulty: Easy trail that is about 1 km according to the visitor center sign.
Facilities: The visitor center was free and had limited hours, which were 10AM-5PM when we visited, but may change seasonally. The free toilet around the back of the building was open 24/7.
Road & Parking: The visitor center had a well groomed road and parking for a couple dozen vehicles. The viewpoint has parking for at least a dozen.
Hellnar - Arnarstapi Walk
Location: Hellnar Parking - GPS Coordinates: 64.750663, -23.646122 Map, Parking - GPS Coordinates: 64.766271, -23.627976 Map
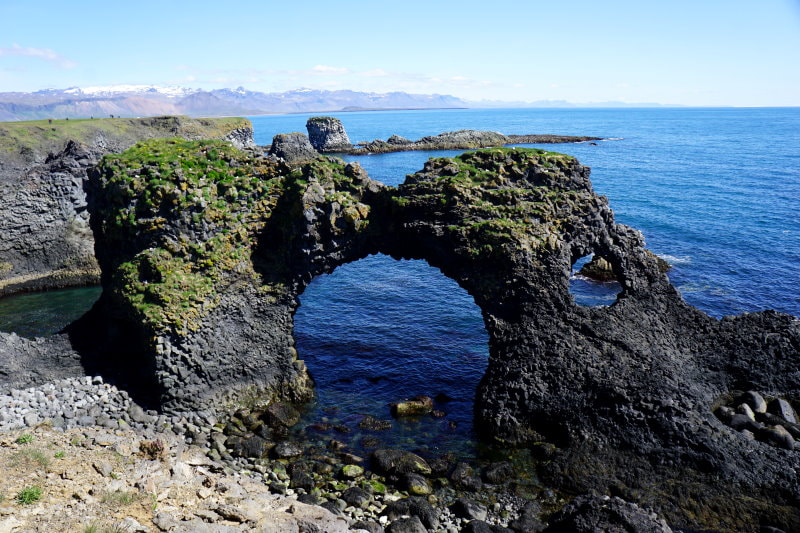
This was my favorite area on the Snaefellsnes Peninsula and one of my favorite walks of this trip. We parked at Hellnar and walked to Arnarstapi and back. You can do this walk in either direction and there is parking on both ends. Hellnar seemed like a sleepy little town with a small cafe overlooking the start of the trail. Arnarstapi is also small but more touristy and is where most of the buses stop because it boasts the large sea arch Gatklettur.
Starting in Hellnar, the first sight was a large sea arch that, according to the map, is called Adam’s Rock. This arch was shaped like a tea cup with one side broken away. From a distance you couldn’t see the arch, but you could see the light streaming in through it turning the water turquoise. It had the feel of seeing one of those cathedral ceilings where the light comes down from above illuminating an area, while the rest is left in darkness. The alcove was full of sea birds spiraling around inside and swooping in and out, their shadows passing through the light.
The trail started out as a wide boardwalk disappearing into the lava field, but quickly turned into a dirt path. There were plenty of people on the boardwalk, but most turned around when it ended. All along the cliffs were other unofficial trails that were great for exploring the many lookout points along the coast and losing track of time. Please try to stay on the ones that are already there to minimize your environmental footprint and leave some plant life for everyone else to enjoy. There were dozens of little coves and pinnacles hidden along the coastline and each turn revealed new spectacular views.
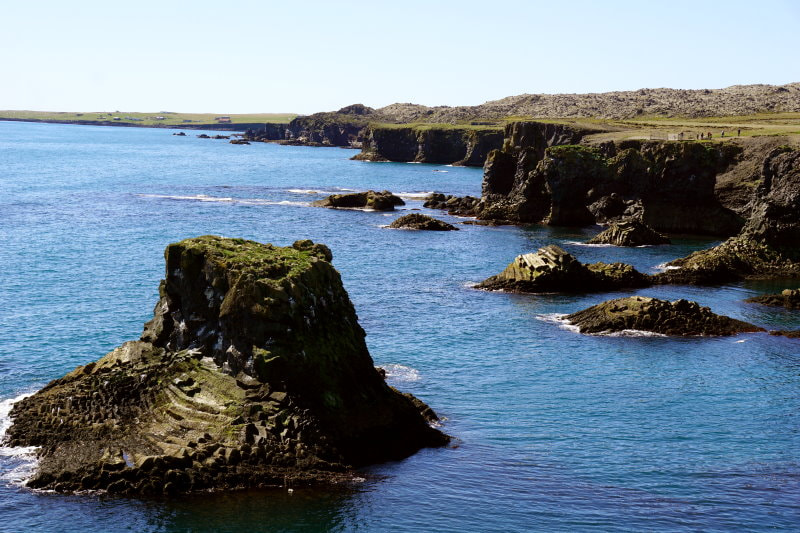
As we neared Arnarstapi the number of people picked up again. There were several viewpoints with people clamoring for a spot along the railing, but the crowds came in waves, so a few minutes later the tour group would move on and the platform would be almost empty. Gatklettur was very cool, but far from the only attraction. There were basalt columns peeking out of the sea that lay sideways and looked like a pile of lumber. The sea along the coast shimmered as it snaked along the sea caves and cliffs. There was a beautiful harbor on a cove on the far side of town and rainbow mountains stretching into the distance.
How Much Time and When?: If you stick to the trail you can do it in about 30 minutes at a brisk pace. On our way to Arnarstapi we took our time and explored and it took us about 1.5 hours. You are also going to want to spent a bit of time in Arnarstapi, so I would budget at least 2 hours. We were here around mid-day and it was beautiful. Sun can be hard to come by, but a bit of sunshine will make a lot of difference here.
Difficulty: The trail had some up and down but wasn’t hard. I would call it a moderate walk.
Facilities: There were no public restrooms in either town, but there were some pay ones in Arnarstapi and some open to dining patrons. Hellnar has a little cafe and Arnarstapi has a range of cafes, restaurants, and food trucks.
Road & Parking: There is parking in both towns
Rauðfeldsgjá Gorge Walk
Location: Parking - GPS Coordinates: 64.798238, -23.637668 Map
Raudfeldsgja Ravine was another one of those places that I felt had a bit too much hype for what it was, but I wonder if something changed recently. This turned out to be a walk up and take a peek, then turn around and walk back kind of stop. We expected to be able to hike into the gorge but there was no way to continue past the first chamber that we could see. This is completely speculation, but the way appeared to be blocked by a large boulder, so I wonder if that wasn’t there before the last freeze thaw cycle. If it was perhaps when it is drier it is passable, but when we were there you would have to climb over it with a torrent of water coming the other way. It was quite slick.
As for just walking up and taking a look this was a cool place, but I preferred Gljúfrabúi in the South because it had both the canyon and a cool waterfall in one.
How Much Time and When?: You only need about fifteen minutes to walk up and take a look. Earlier is better for lighting as this faces southeast. We were there around 3PM in late May and it was getting dark in the canyon.
Difficulty: Easy, gradual incline along a sandy trail on the way up. In the gorge there was some shallow water.
Facilities: None
Road & Parking: Parking for about ten vehicles, which was well beyond capacity when we were there. People were parked all along the driveway making it hard for others to get in and out. Some people had to back out. This is right off the main road and the parking is a rough gravel lot.
What to Bring: You will want waterproof boots or grippy sandals to go into the canyon. We wore Salomon Quest 4d Boots and KEEN Targhee Boots but anything waterproof with good grip will do.
In Between: This area had a wall of beautiful lightly rainbow hued mountains along one side.
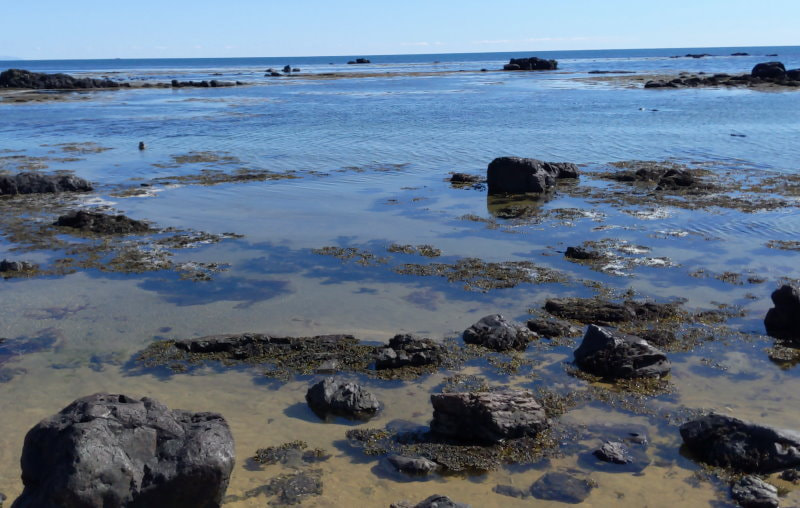
Ytri Tunga (Seal Beach) Walk
Location: Parking - GPS Coordinates: 64.803757, -23.081234 Map
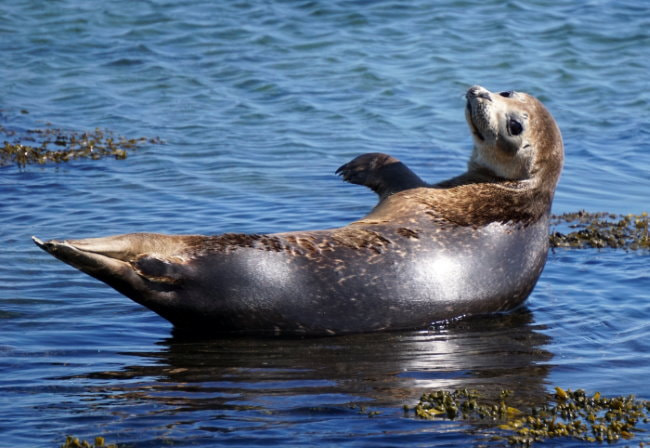
This place was magical! We were hoping to see a seal or two but when we arrived there was a whole group of them playing in the lagoon. They were swimming around and slapping their tails. A few curious ones were looking at us and seemed to be trying to figure out what we were doing. One would pop up and look, then go under and pop up a bit closer, then closer. It was a little intimidating since I was out on some rocks, but very cool behavior to see. I took this as my hint to move a bit farther from the water’s edge to prevent any surprises.
I don’t know what a typical day here is like, but we felt very fortunate. After watching the seals play for a bit we decided to walk a little farther along the beach before returning to the car. We walked around the corner and saw this seal sunning on a rock! All the other people were watching the seals in the lagoon so we were the only people there. It glanced over every so often but mostly ignored us. We were wondering if something was wrong with it when it rolled off its perch and swam away.
This was also another great place to see lots of birds.
How Much Time and When?: We were here around 4PM and it was nice. I’m not sure if there is a time of day that is best for seeing the seals. I think an hour would be plenty of time here, but it depends upon the day.
Difficulty: Easy flat path.
Facilities: Some nice info signs that talk about the different species and their life cycles.
Road & Parking: Nice gravel lot with a good amount of parking.
What to Bring: A telephoto lens because these are wild animals and you want to keep your distance to keep everyone safe. I also recommend sunglasses, preferably polarized so you can see into the water better.
In Between: This section took us through mostly flat fields, much of it dotted with wildflowers. There were very few facilities so we were glad to come across an info center with free public toilets at GPS Coordinates: 64.844242, -22.653361 Map. This was a nice restroom.
You can also check out Gerðuberg Cliffs (which may require some rough driving) and Landbrotalaug Hot Pot along the way, but we didn’t stop at either of these.
Eldborg Crater Hike
Location: Parking - GPS Coordinates: 64.773208, -22.304712 Map
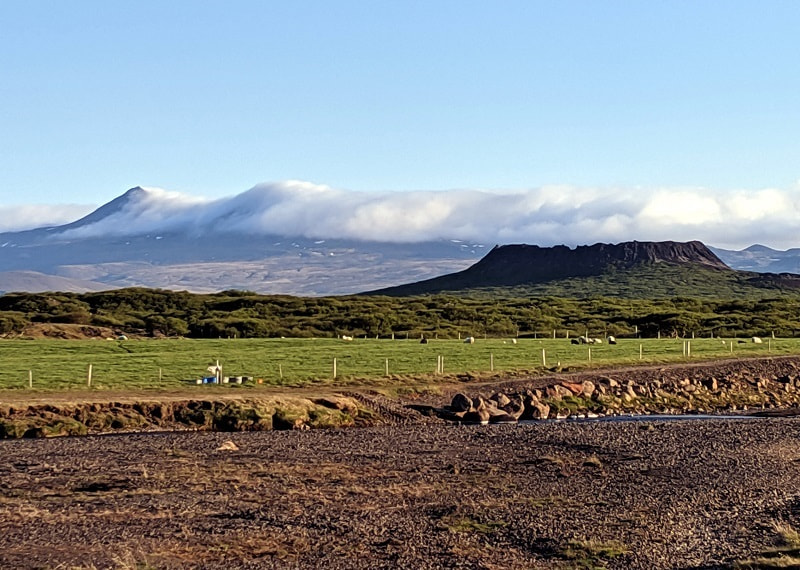
We had never heard of this crater and stumbled upon it when we stayed at Snorrastaðir Farm Campsite. This was one of those hikes where we just figured as long as we were there we might as well check it out.
The hike was not particularly interesting, but was very different for Iceland. Most of it was on a well groomed trail through dense shrubs growing on an ancient lava field. When we reached the crater we were impressed by how well done the trail was. There were iron posts with chain to assist you in your climb and descent.
How Much Time and When?: It took us about 40 minutes each way. Best lighting would probably be about mid-day to avoid the shadows inside and outside of the crater. The first photo above was taken early morning from our campsite and the second was from our late evening hike.
Difficulty: Other than climbing the crater itself this is not hard, but is a long hike (about 3 km each way). There was one ladder to climb over a fence. The trail was very easy to follow.
Facilities: There is a toilet at the farm, but it is for customers only. The sign at the trailhead gives a nice description of the area.
Road & Parking: Parking is at Snorrastadir Farm, which is down a short road that didn’t appear on Google map at the time we visited.
Glymur Waterfall Hike
Location: Parking - GPS Coordinates: 64.385174, -21.293454 Map
Glymur is one of those hikes that, for me, has it all. You have beautiful canyons, a cave/double arch, stunning 360 degree views, and one of the tallest waterfalls in the country. This hike also has the feel of a mini adventure, with high cliffs, steep sections, and river crossings, without being particularly dangerous.
We were the first vehicle in the parking lot that morning. We were greeted by the unusual sign on the gate stating “log is over the river.” The hike started gently, passing through a field of lupines in full bloom. We crossed a couple little streams that were just a couple inches of water trickling across the path with some stepping stones.
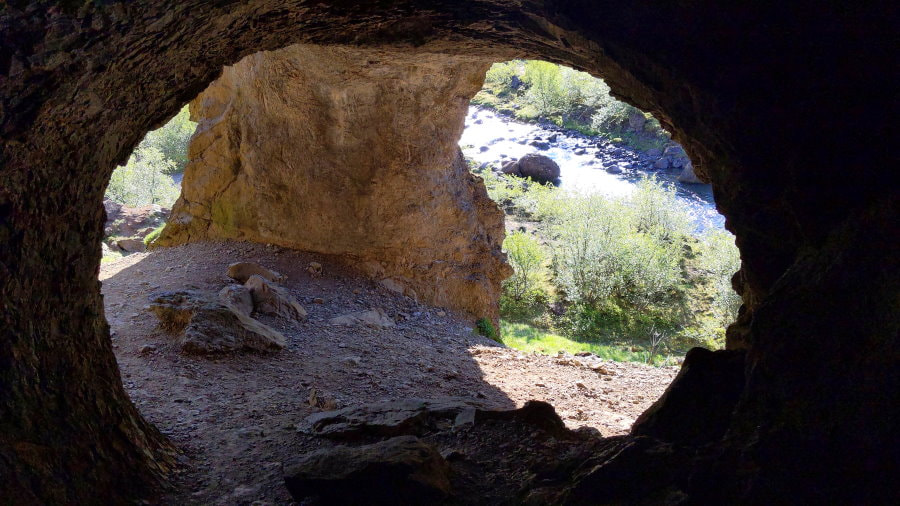
After a little bit the trail split and we took the more popular fork to go around the right side of the canyon first. The trail started to go down towards the river and had a sign for Þvottahellir Cave. This cave is more of a short tunnel than a proper cave, but is pretty cool. The trail goes right through it and at the bottom it has a giant arch with two exits, supported in the middle by a single pillar of naturally formed stone.
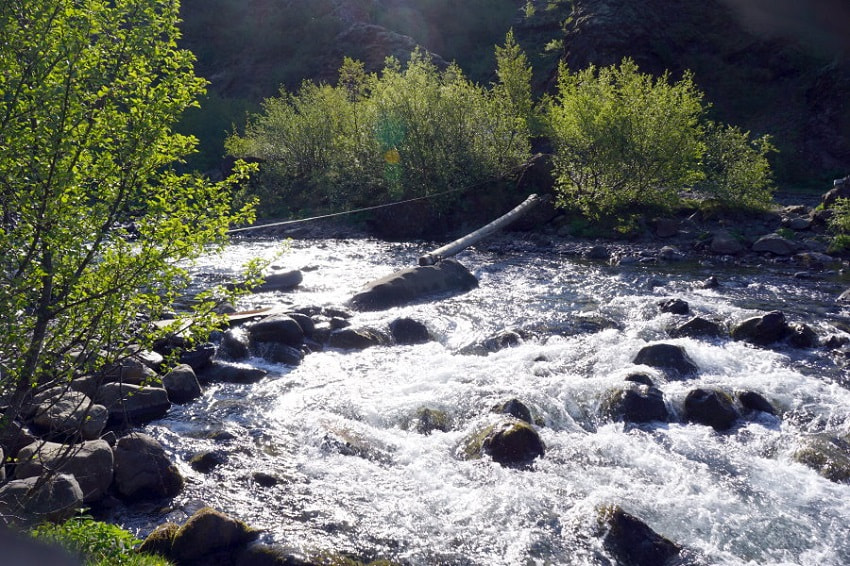
Just beyond the cave is the aforementioned log over the river. This looks and sounds worse than it is. Yes the water was flowing pretty strong here, but there is a cable to hang onto while you walk across the log. We took turns crossing while the other had the camera out, just for encouragement, in case there was a memorable moment to capture. No such luck though. We both crossed easily without any issue.
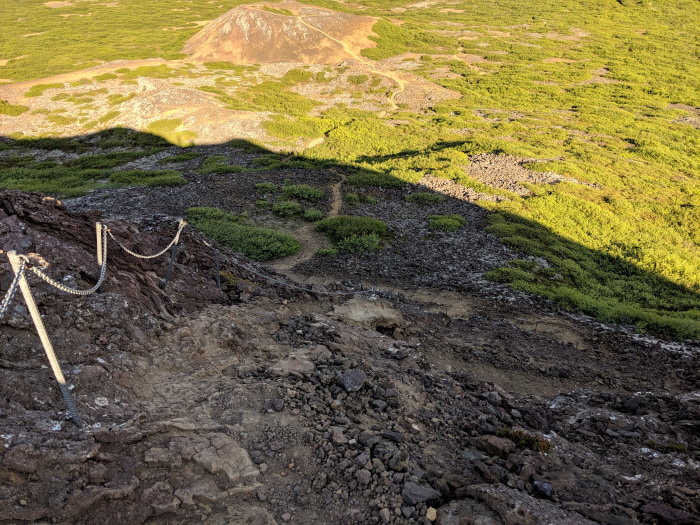
After the log the trail starts to climb quickly and there were many ropes to assist in the slick sections. As you climb you will quickly rise above the brush and start to get some excellent views of the canyon and surrounding landscape. There also were a couple small waterfalls here and there.
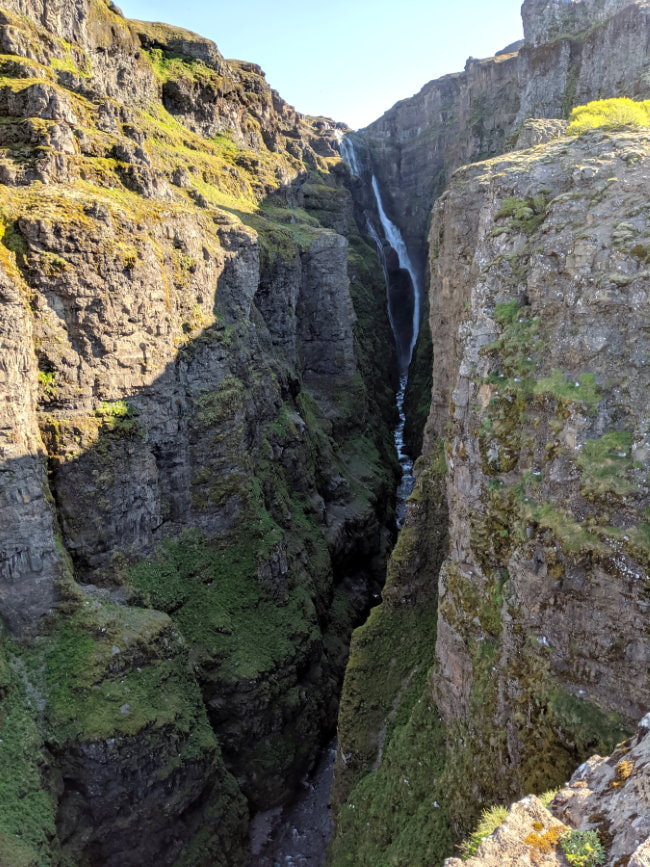
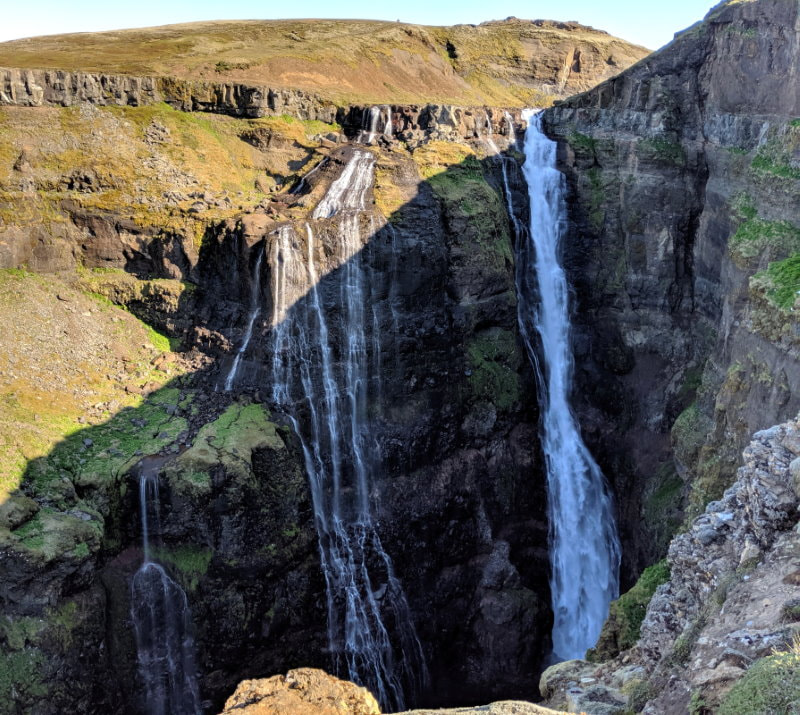
About an hour in we made it to the first lookout point and were rewarded by a beautiful view down the canyon. We could see most of Glymur. This waterfall used to be labeled the tallest in Iceland until another was found in the highlands that edges it out, so now it is only a meager second tallest. Standing at 198 meters or 650 feet it is pretty impressive.
Once you climb a little higher you can start to see the fjord in the distance. A bit farther and you get some incredible views of both Glymur, plunging straight down into the canyon, and the more graceful waterfall beside it that slides down the canyon wall in wispy rivulets. The canyon walls are so steep here that when you are looking at these waterfalls you have a 300+ foot drop directly in front of you. That combined with the thundering of the falls makes this place feel powerful, but may not be for everyone. Most of the path stays a bit farther from the edge, but there are a few areas that pass very close, with no alternate routes.
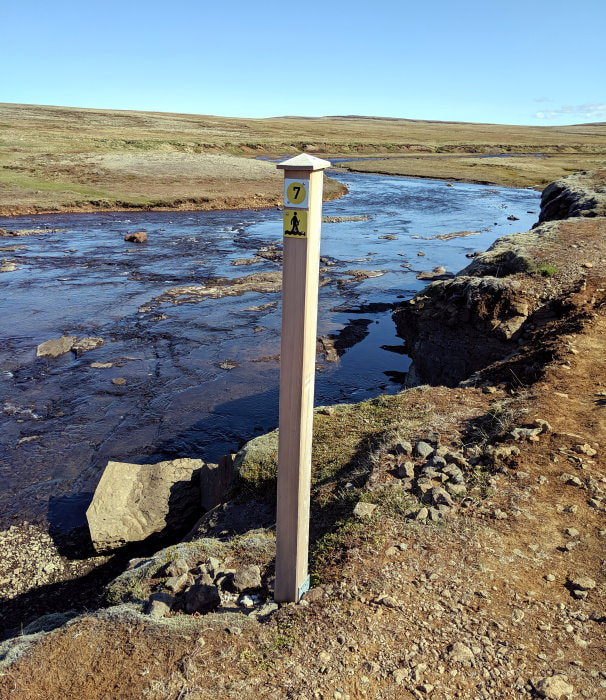
At the top of the waterfall you walk up stream a little ways and come to marker 7. This is the point where you have to make your decision. Will you cross the river or go back the way you came? We chose to complete the full loop and went for it with our boots on. We made a couple false starts, but finally found a spot that we thought was shallow enough to carefully cross. The last couple feet were the deepest and we made it, kind of. We both got across, but my husband got a bit of water in one boot on one of his last steps. We didn’t have any spare socks with us, so he had no choice but to sog his way back. At least this was our last hike of the trip.
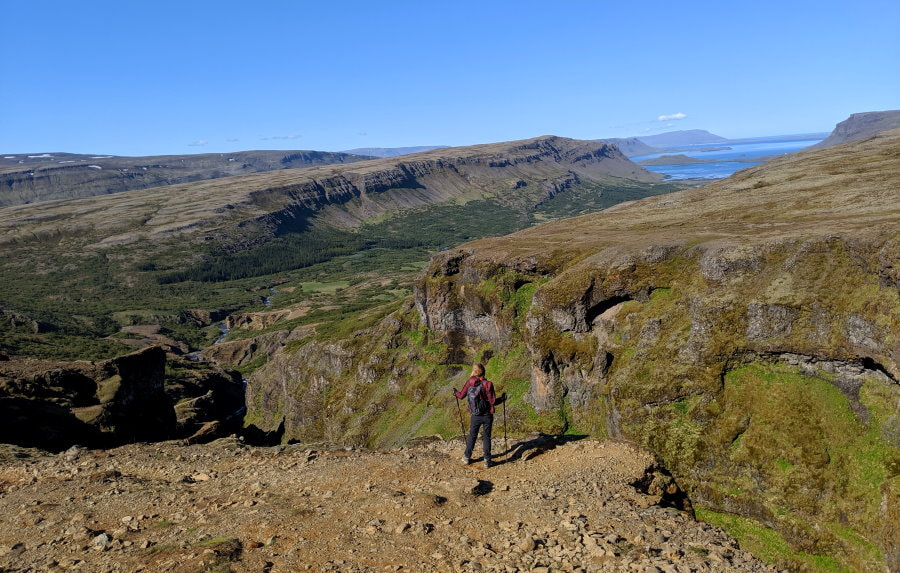
On this side of the river there is a rim trail that is more difficult (3.2 km), but takes you along the canyon, and an easier trail (3.0 km) that takes you farther out. We opted for the harder one that stuck to the canyon. This trail was much less established than the one we took up and didn’t have much of a view of the waterfall, but had a great view of the other side of the canyon. We saw other hikers slowly start to make their way up in increasing numbers as we climbed down.
We were very glad to have the hiking poles both for the river crossing and for climbing down sections of this trail. While the more popular trail was well equipped with ropes, this side had very few, and many sections of loose rock were a bit too close to the canyon ledge for comfort. I enjoyed the views and the different perspective and I’m glad we did the full loop, but the other side definitely was definitely better in terms of conditions and views.
How Much Time and When?: 3-5 hours depending on your pace. We arrived just before 8AM on a Friday in late May and were the only vehicle in the parking lot. While having the trail to ourselves was worth it for me, you will have much better lighting later in the day. It was beautiful, but most of the canyon and waterfall were shrouded in shadows. We finished around 11:30 AM, after completing the entire loop across the top of the waterfall and back down the far side, and much of the canyon was still dark.
Difficulty: This trail is not technical or involve bouldering, but it does involve some up and down holding onto ropes and chains, and a couple river crossings. The full loop is about 7km.
Facilities: A couple signs and trail markers that give direction and location on the map.
Road & Parking: Lots of parking in a decent gravel lot. This was a huge parking lot, but by the time we left around noon it was mostly full.
What to Bring:
-
Shoes - You will need solid boots, preferably waterproof for the stream and potential mud crossings. We wore Salomon Quest 4d Boots and KEEN Targhee Boots.
-
Towel - I highly recommend a fast drying towel and a change of socks because even if you don’t plan on going in the water, well….things happen and it is a long way back.
-
Electronics Protection - Again just in case I would at least bring a large ziplock bag.
-
Sandals or water shoes to protect your feet from the rocks if you plan to cross the river at the top of the waterfall. We got lucky and the water was low enough that we were able to pick our way across with mostly dry feet in our high waterproof boots, but that isn’t always a possibility.
-
Rain gear just in case
-
Clothes - Comfortable clothes that allow you a large range of motion and layers. You probably won’t enjoy jeans on this one.
-
Layers! - You start out low, sheltered in a valley, but once you climb up the wind can be brutal so be prepared.
-
Water - Any hydration pack or bottle will do.
-
Hiking Poles - I recommend these with the caveat that you know how to use them and have a bag that you can stow them in. I found them extremely useful on the slick sections, especially on the far side which had less ropes; however, you need your hands to cross one of the rivers and to hold onto the ropes and chains, so in these areas the poles can get in your way and quickly become more of a hindrance than a help.
-
Check out Day Trip Essentials for a full packing list.
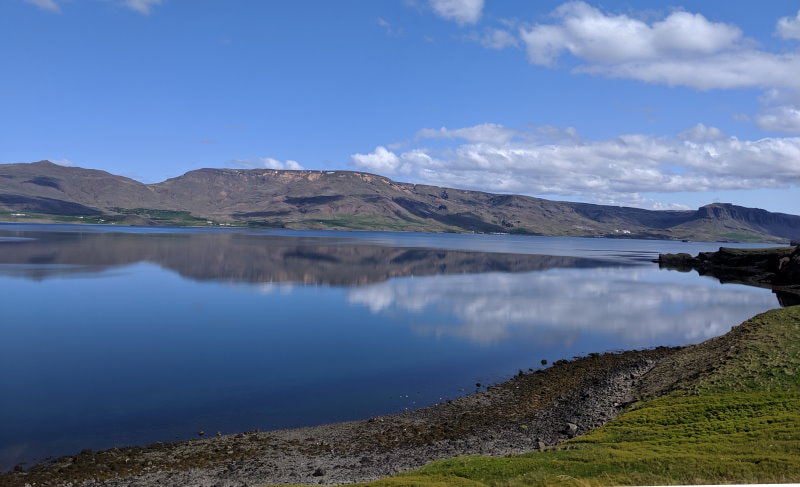
In Between: We took Route 47 back towards Reykjavik and the views around Hvalfjörður of the mountains reflecting in the water were just stunning. It was a great ending to an awesome adventure.
For a few more attractions, maps, and more info on West Iceland you can check out the Visit West Iceland Website.
Product Links: I am not sponsored by any of the products I link to. If you choose to make a purchase from one of the links of a product I listed or any other item a small percentage will go back to me to fund this website, at no additional cost to you. The products I link to are either ones I have used or similar if those are not available. Thank you for your support.
More?
For more of Iceland see my full Trip Itinerary & Travel Budget.
Keep going around the Ring Road to Southern Iceland, Eastern Iceland or Northern Iceland.
Info and Tips on Campsites around the Ring Road
Check out our full Peru Trip Itinerary.